How to reduce notifications on your iPad Pro
Are you person that tends to ignore more than 50% of your app notifications on your iPad? How about always swiping right and clearing all those notifications? I fit in to these categories and although notifications are sent by default, there are plenty of ways to control it to get the notifications you want that timely and relevant. Keep in mind that this post applies to all iPad and iOS devices.
For Apple Watch, you’ll have to manage these settings in the Apple Watch app.

How to manage notifications on your iPad Pro, iPad, iPhone
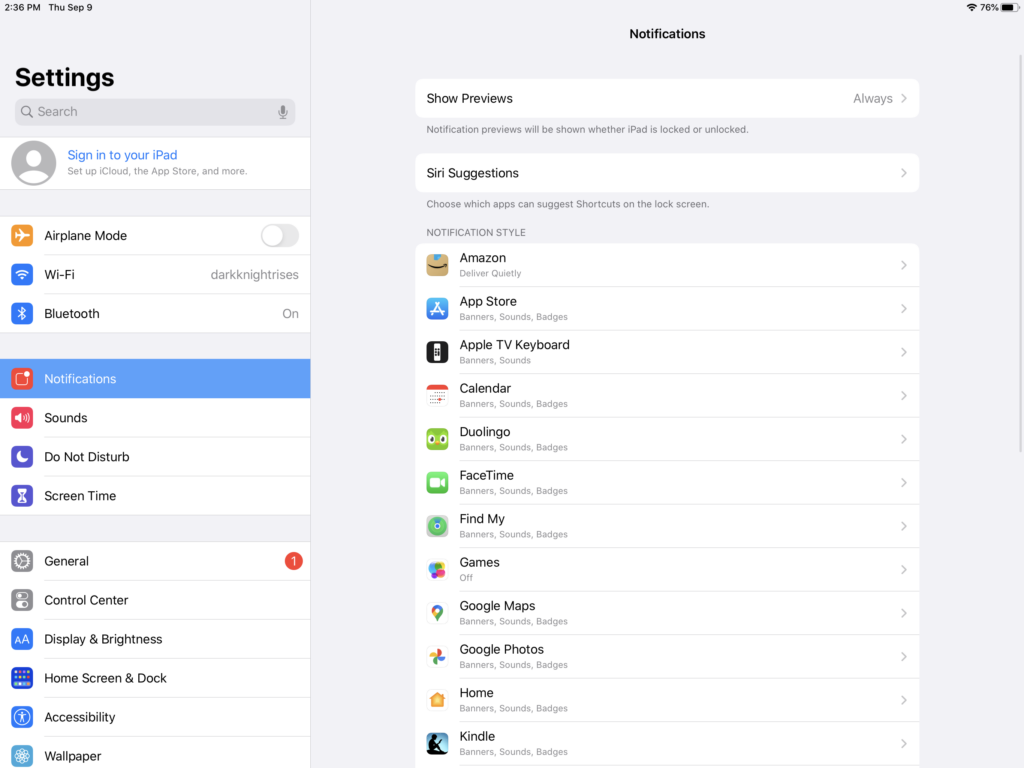
- From your unlocked phone or iPad, look for and tap on the app icon called “Settings”

- In the settings app, look for a label called “Notifications”

- To choose when you want most notification previews to appear, tap “Show Previews”, then select an option—Always, When Unlocked, or Never. Your previews can include things like text reveals and invitation details. (Note: You can override this setting for individual apps.) It’s clear what happens by “always” or “never” show preview, but for those who are wondering, “unlocked” occurs when you unlock with your fingerprint, but haven’t swiped up to get to home screen. One example is that if you’re face is front of it, it’ll automatically trigger FaceID if you are looking directly in front of it, revealing text.
Managing individual app notifications
To turn on or off certain app notifications, you can look for the icon of the app that you want to manage.
- Tap Back to get to the top level of the “Notifications” settings, then tap any app below “Notification Style”.
- There’s a toggle that says “Allow Notifications” and you can flip it on or off.
- If you turn on Allow Notifications, you can choose how and where you want the notifications to appear for the app. There are three settings with visual representations on how they’ll appear: Lock Screen or in Notification Center, or Banners. You can toggle all three on or off. By default, they’re all checked on. Banner Style allows you to be persistent or temporary. An example of temporary banner, is when a notification appears over your app, but goes away after a few seconds if you don’t touch it, while Permanent would stay on the screen covering the app until you choose to dismiss it.
You can also set a sound and badges for many apps, in doing so, you choose to have it on or off.
Grouping notifications
When you group notifications, it allows you to scan your notification center or unlock screen faster seeing the types of notification you’ve gotten before you decide to dive deep in a type. For example, it’ll stack iMessage notifications visually on top of each other and won’t reveal them all until you tap. The most recent notification will appear on top.
To group notifications, you’ll also do this in the individual app notification setting.
- Tap Notification Grouping, then choose how you want the notifications grouped:
- By App: All the notifications from the app are grouped together.
- Automatic: The notifications from the app are grouped according to organizing criteria within the app, such as by topic or thread.
- Off: Turn off grouping.
To turn off notifications selectively for apps, go to Settings > Notifications > Siri Suggestions, then turn off any app.
Having Siri announce messages
This is a new setting in recent years and connected with Apple’s personal assistant on your phone, Siri. This allows Siri to automatically announce messages when your headphones are on (currently only 2nd generation AirPods and up, as well as Beats headphones).
There are only two apps that automatically announce which are “Messages ![]() ” and “Home
” and “Home  ” apps.
Also keep in mind that if you enable announce messages on, it will turn back on the notifications that have been turned off.
This makes sense because if you turn announce messages on, essentially you are saying you want to hear your messages so the device needs to get your notifications back on. But that’s something to be aware of when you are enabling this.
While using a voice assistant, you can also reply to these messages that are being announced to you. You can opt into “reply without confirmation” in this setting too. It’s automatically off by default as most users will probably want to hear the message read back to them to confirm it’s transcribing correctly.
How to choose which messages are being announced to you
- You can choose which “Announce Messages with Siri”
- With this setting toggled “on”, go to “Messages
 ” and select which one under “Announce messages from”
 - You have a choice between 4 options:
- Favorites: Announce messages from Favorite contacts only. Favorites are set in the Phone app
- Recents: Only announce messages from people you’ve messaged today
- Contacts: Announce messages from people saved in Contacts only
- Everyone: Announce all messages, this includes strangers and automated texts from services that you’ve give your number. I sometimes get it from Home Depot.