Most email accounts fall under one of two categories, POP or IMAP. If you have a Windows Live or Hotmail, or Yahoo! Email account you are using a POP email account. GMAIL is POP compatible but is a fully IMAP implementation.
POP is an acronym for Post Office Protocol. POP is the oldest and most widely used email system on the internet but it is not conducive for those who check emails on multiple devices like your iPhone or PC. POP servers transfer incoming mail to which ever device accesses it first. Unless your ISP or Emailer provider stores emails on its own servers you will have trouble syncing your emails to different devices.
IMAP stands for Internet Message Access Protocol and is a more recent email implementation with more features and the ability to sync email usage across multiple devices and email clients. IMAP servers accomplish this act by storing your email files online and remember which messages you have accessed.
Your iPad can interface with either a POP or IMAP account. You would set up a POP or IMAP email account as you would any email account on the iPad. The easiest way is to just sync with iTunes if you use a compatible mail client such as Apple or Microsoft Outlook. Otherwise, follow the steps below to setup your email account.
1) Tap “Settings” on the home screen. Or you can tap Mail Icon and skip to step 4 if you are setting your mail for the first time.
2) Tap “Mail, Contacts, Calendars” on the left hand panel.
3) Tap “Add Accounts” on the right hand panel
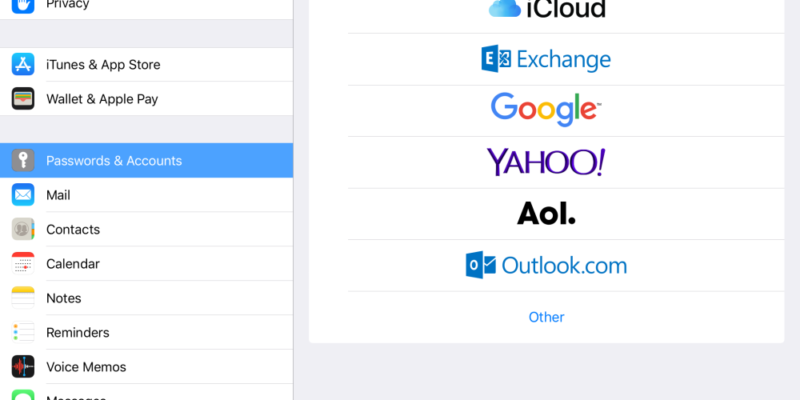
4) If you have a Microsoft Exchange, MobileMe, Gmail, Yahoo, or AOL email account, tap the icon. If you do not have one of those accounts you will have to press “Other” and manually input the email settings and server configuration given by your email from your email provider.
5) Type in your name, email address, and password.